Connect with Azure AD
With kwilo's Azure AD integration, your enterprise users can instantly log in into kwilo.
In kwilo
As a kwilo administrator, go to Organization > Integration > Azure AD and copy the Redirect URI (${REDIRECT_URI}).

In Azure AD
As an Azure AD administrator, open the app registrations in a new browser tab.

and then click on New registration
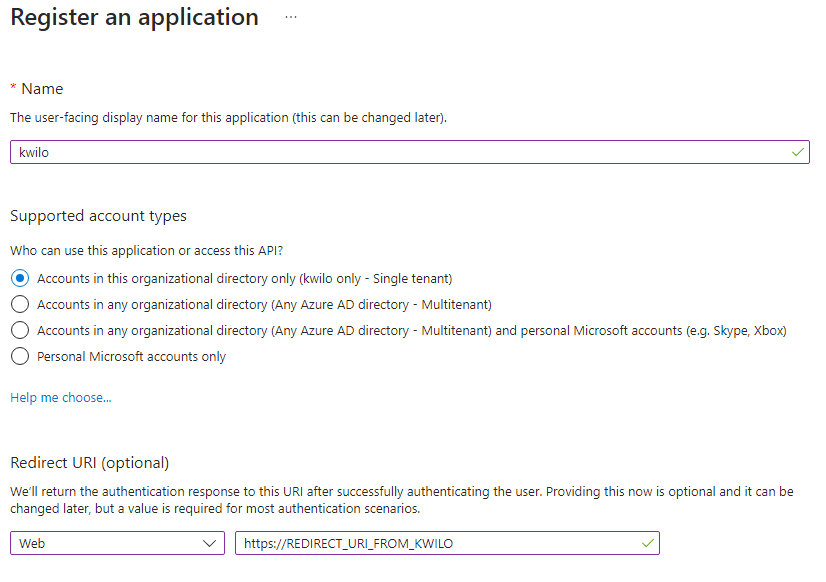
Settings for the application registration
In the upcoming registration form, set the following values:
| Setting | Value |
|---|---|
| Name | kwilo |
| Supported account types | Accounts in this organizational directory only |
| Redirect URI | Web |
| Redirect URI (URI) | previously copied ${REDIRECT_URI} from kwilo |

After you have added the application registration, you have to copy the Application (client) ID from Azure AD. Paste that value in kwilo's Application ID field:

Create a new secret
In the left menu, select Certificates & secrets, click on the Client secrets tab and click on New client secret:

Fill out the form and set a reminder before the token will expire:
After you have added the newly created secret, copy the Value in the table and paste into into kwilo's New secret key field:

Saving the settings in kwilo
In kwilo, push Configure Azure AD integration. When opening your kwilo subdomain, you will be automatically redirect to your Azure AD tenant.
Via command line
If you want to set up the Azure AD integration on the command line, you can do this with
php artisan auth:aad ${YOUR_TENANT}
You will be prompted with the Redirect URI and asked for the application ID and secret value.
Importing and synchronizing users
You can automatically let kwilo import your Azure AD's users. You can either load the users based upon their security group membership or assigned application roles. In your Azure's app registration, get the Directory (tenant) ID. In kwilo, navigate to Organization > Integration > Azure AD > Synchronization and paste the Directory (tenant) ID into AzureAD Tenant ID.

Your application registration needs the following Microsoft Graph permissions:
Group.Read.AllUser.Read.All.
In Azure AD, navigate to your application registration > API permissions and add the required permissions:

By security group(s)
Enter the security groups to be imported in the corresponding field.
| Format | Effect |
|---|---|
<empty> | No security group will be imported |
* | All security group will be imported |
employee_sg | Only security group employee_sg will be imported |
employee_sg,admin_sg | Security group employee_sg and admin_sg will be imported |
By application role(s)
Enter the application roles you want to import in the corresponding field. In Azure AD, you have to assign the application roles and users to kwilo's Enterprise application. The format of the input field is identical to security groups.
Please note, that if an application role is assigned to a security group, the given security group will be imported in addition to the already configured security groups.
Via command line
You can also trigger the import of users via command line:
php artisan user:synchronize:aad ${YOUR_TENANT} {--security-groups=} {--application-roles=}